Jon Elson's Machining Page

A Mini-EDM System

Overview

I built a small EDM system, primarily for burning out broken-off taps in aluminum parts. But, now that I see how easily it works, I can see many other things that it could be used for. I built this whole system over a weekend, entirely out of parts I had laying around. (I do have a lot of pieces, both electronic and mechanical.)

Electrode

The electrode I made up consisted of a piece of .060 brazing wire soldered into the socket of an 8-32 socket-head cap screw. I threaded this into a nylon spacer that I happened to have, that already had an 8-32 threaded hole in it. I put the spacer into the drill chuck on my mill. The nylon spacer is the insulator that prevents the electrode from grounding out to the chuck, and the rest of the milling machine. I connected the power supply to the electrode by way of a soft stranded wire, so that the wire wouldn't deflect the brazing rod. The end of the wire was stripped back about one inch, and the wire strands were loosely wrapped around the brazing rod. This made a remarkably good electrical contact, while allowing the brazing rod to turn freely. I could put just a slight bend in the rod so that it would make a very slight (ie. .010") orbit if the spindle were rotated. This seemed to get the best metal removal and depth progress before the hole got filled with removed metal and shorted out.
A view of the EDM electrode assembly in a Jacob's chuck.

Power Supply

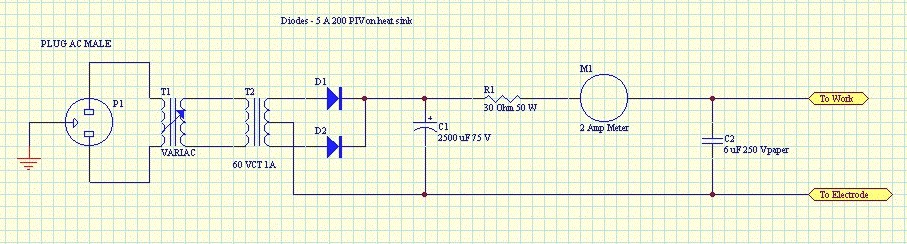
The power supply I threw together was quite simple. A variac (variable autotransformer) is used to adjust output voltage. A 200 Watt variac (1-2 Amps at 110 V) is quite adequate. A step-down transformer, which provides isolation, is the next component. The one I used was center-tapped, allowing the use of 2 rectifiers. If your choice of transformer does not have the center tap, or the voltage is too low when using it, you could use a bridge rectifier on the two outer connections of the secondary to get higher voltage. A filter capacitor provides smoothing of the DC voltage produced. A resistor allows the 
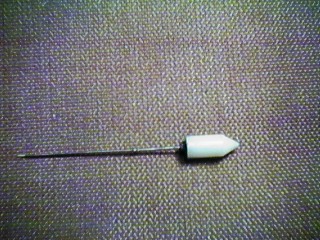
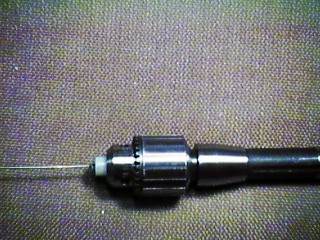
electrode to short to the work without blowing fuses, and also moderates the flow of current from the raw DC supply to the EDM capacitor and electrode. Choose a resistance that will cause a short circuit current at least twice the desired EDM current at the selected voltage. Then, make sure the wattage is sufficient to prevent the resistor burning up during a few seconds of short circuit. With the DC supply set to 30 Volts, a short would draw approximately 1 Amp, and since P=I^^2 * R, that is about 30 W, using a 30 Ohm Resistor. The ammeter shows current into the EDM capacitor. The EDM capacitor delivers short bursts of very high current whenever the insulating film of the EDM fluid gets very thin between the electrode and workpiece.

EDM Fluid

Not having distilled water around, I tried tapwater. It was boiled away very quickly by electrolysis, and didn't do much good even when it was there (perhaps all that bubbling got in the way of the EDM process). I then tried the nearest thing at hand, which was "Alum-Tap", a light, clear tapping fluid for aluminum. It must be pretty close to EDM fluid, because it worked so well! It lasted a long time before being spattered away by the gases generated by the EDM action. Most of the time, I only had to add a few drops before the hole became filled with removed metal.

Operation

The way I set this up was pretty much by trial and error. But, here are my settings: I set the power supply for 30 Volts. This seemed to give a very strong discharge action without producing too much gas or heat. I lowered the electrode with my NC control's jog buttons until I got electrode contact (indicated by about 1 Amp current suddenly appearing on the ammeter). I then raised the electrode with a very slow jog until the current dropped to zero. I then entered a manual command to advance the electrode at a rate of about .010" / minute, and after a few seconds, the ammeter would show a current of 1/4 to 1/2 amp. I would modulate the feedrate with the feedrate override controls, attempting to keep the current within these limits. By bending the electrode just a tiny bit, and running the mill's spindle at the slowest speed (80 RPM), I could get any diameter hole I wanted. I set it to just keep a tiny bit of the flank of the tap, but to burn out the entire web (central portion) of the tap. This allowed me to pick the remaining part of the tap's cutting edge out of the aluminum easily with a fine needle when the EDM electrode had cut all the way through. Progress all the way through was evident when the tool was still advancing with no EDM current.

Since I didn't have a means of providing a flow of EDM fluid through such a small electrode, I had to pull the electrode up every .025" or so, wipe out the contaminated fluid with a paper towel, and then drip a few drops of the Alum-Tap into the hole.

To Home